Showing posts with label Craft. Show all posts

Saturday, March 30, 2013

Easter Round-Up

Hop Into Spring: 15 Great Spring and Easter Ideas


Over here at Casa Riley we're in full blown Easter mode. Decorating eggs with the kids, making handmade presents with my sister, cooking big family meals and even whipping up half a dozen batches of fudge to hand out as Easter gifts for the grown ups. After Christmas, Easter is the most important time of the year for me and I love to spend it busy and surrounded by family!

Seems I'm not the only one that feels this way... So many of my favourite bloggers are busy, busy, busy too! I've teamed up with some amazing bloggers to share a round up of some great Easter crafts, DIYs and recipes! Just what you need to find all kinds of amazing inspiration just in time for Easter! Make sure you take a second and stop by to visit these amazing bloggers and check out their great ideas!  

**Note: When pinning, pretty please pin directly from the original blog. Just click on the links or image and pin away!!**
 
DIY Easter Coloring Pack
Rainbow Fruit Salad with Caramel Toffee Fruit Dip
No Sew Easter Baskets
Kentucky Derby Wreath
Adorable Easter Cupcakes
Spring Pinwheel Wreath
Easter Hors D'oeuvres Party
White Chocolate M&M's Pudding Cookies
Glitter Bunny Easter Jar DIY
Chocolate Easter Bunny Cards
Robin's Egg Nests
Berry Gift Basket
Lemon-Chess-Bread-Pudding
Free Easter Printable Pack

So much amazing inspiration! I hope you all have a blessed Easter surrounded by people you love.


Thursday, January 24, 2013

Make Your Own Fishing Game

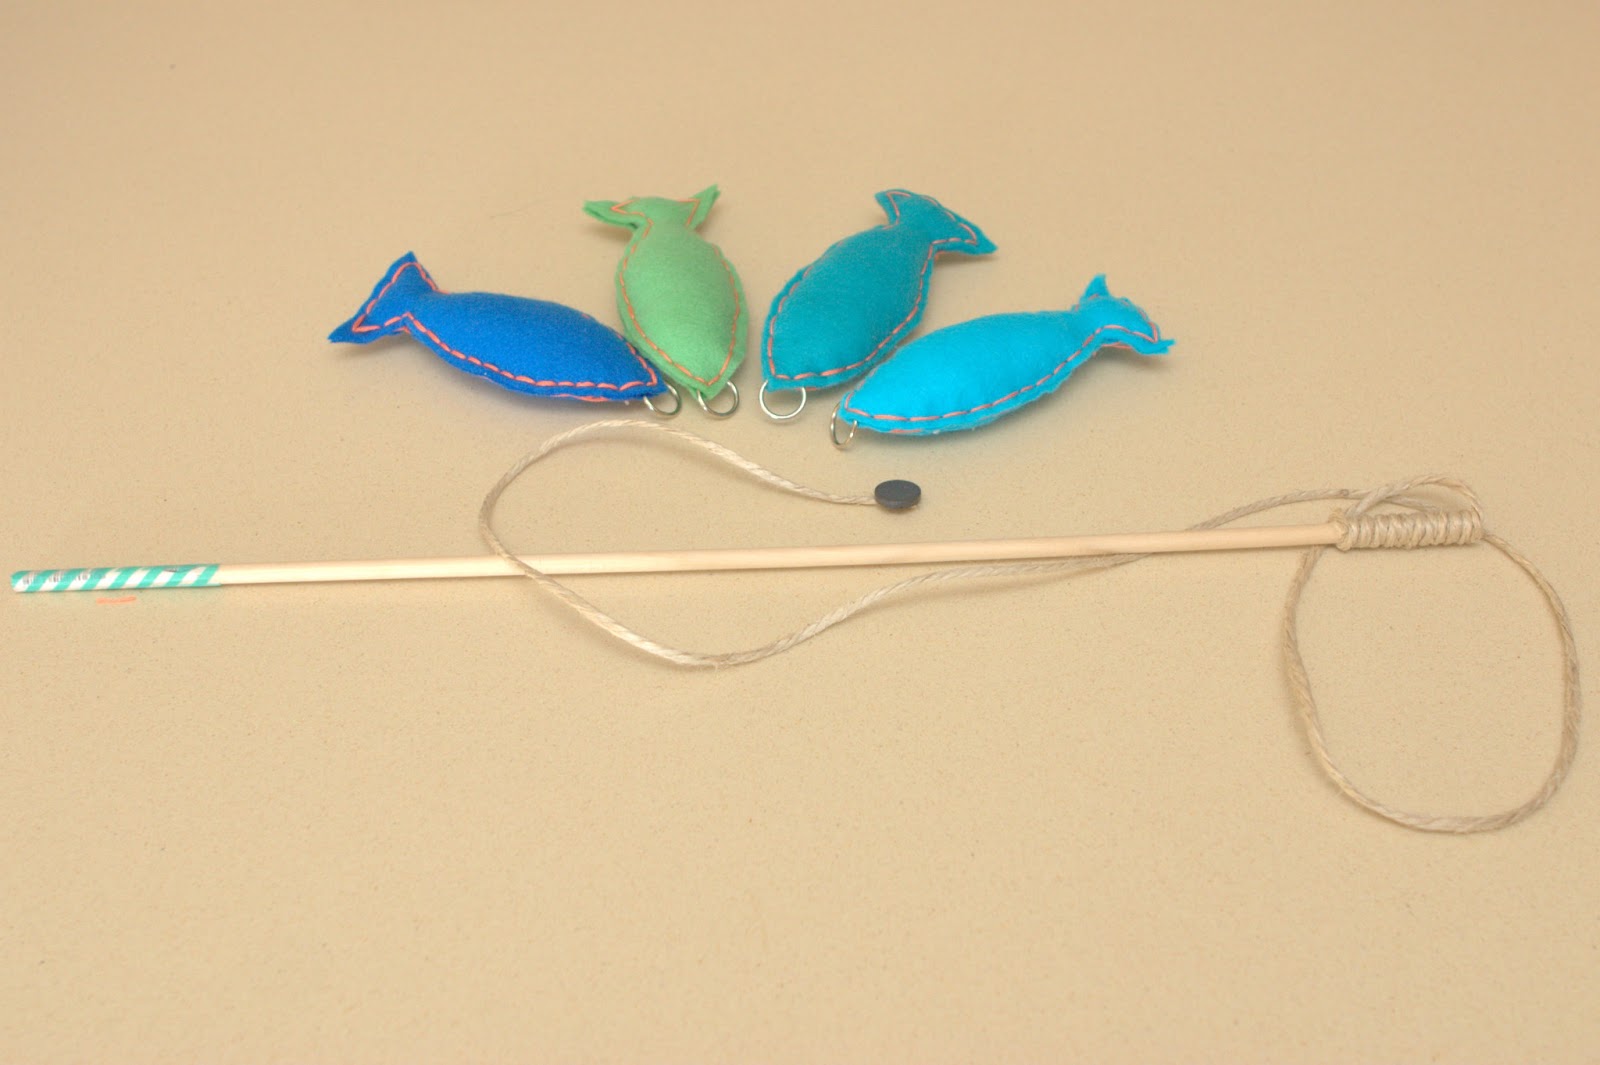
For Max's birthday party back in December I put together a little fishing game for the kids to play. It was a big hit and they all absolutely loved it. It was so much fun watching the concentration on all of their cute little toddler faces as they tried to 'catch' the fish!


After the party I decided to make Max a more permanent version of the game using felt fish rather than paper ones. I orginally planned on including it in his Christmas stocking, but I didn't quite get there... Last week I finally got my butt into gear and made it for him. I would sit on the couch making it as Max watched ABC for Kids and he kept asking me 'those fishys for me?' and 'can I play with my fishys yet Mumma?'. When I did finish and let him have a go he was beyond excited!!


It was so easy to make that I can't believe I procrastinated for so long!

I started out by drawing a basic fish shape and then cutting it out to use as a template. Then I traced it onto my pieces of felt and cut out my little fishys.


I chose a fun bright orange embroidery thread to stitch them up with. I guess I was still stuck on the colours from Max's party :).


I hand stitched around each fish until I got to the pointy bit (I want to say it's nose, but I don't think fish have noses.... or maybe they do, I'll stick with 'the pointy bit'). Once I got there I added in a little metal hoop so that the magnet would have something to stick to.


I kept sewing around the fish until I only had a little gap left, then I stuffed the fish with hobbyfill and finished sewing them up.


I used the same fishing rods that I made for the party. They were super simple to make too. I wound some jute around the top of the balsa wood dowel and secured it with hot glue, hot glued a magnet to the end of the rope and added some washi tape to the base for decoration.


Max really loves playing with it! I'm always so thrilled when he loves handmade toys!! It's a great game for hand-eye co-ordination and takes a bit of concentration on his part :)


Tell me... Do you like making or buying handmade toys for your kids to play with?


{Come and join me on Facebook or Pinterest - you'll often find me pinning at 2am as I feed my hungry baby!}


Tuesday, January 8, 2013

Toddler Tuesday - Playing Matchy Match

Back before Christmas I made Max a matching pairs game for my project in the handmade gift round-up (you can see the tutorial here).


I was actually really nervous for him to open it on Christmas day, I thought he might just brush it aside in favour of the things he asked Santa for (Angry birds, chuggington, trucks, fire engines etc).

So when he opened it and actually loved it I was equal parts happy and surprised. When we were playing with it on Christmas Day he asked me 'why you make this for me Mumma?' and I told him 'because I love you'. He gave me the cutest smile and said 'I love this thing you made for me Mumma'. Toddlers are seriously the sweetest thing on the planet!!


We've played it several times in the last week and I can't believe how good Max is at it. He definitely has a better memory than me!!


Thursday, January 3, 2013

Top Ten Blog Posts of 2012

I started 2012 off with a slew of DIY projects, but things definitely slowed down around these parts as my belly got bigger and bigger!

My top ten DIY projects (most viewed) from last year are:


1. DIY TeePee from the Summer Pinterest Challenge
5. White Chocolate Lemon Truffles from the 12 Days of Christmas Round-Up
6. Jumbo Ruler Height Chart from the Winter Pinterest Challenge


I have a whole lot of projects planned for this year, I just need to find some spare time first!! Can't wait to share them all with you :).

Happy New Year!


Monday, December 10, 2012

9 Handmade Christmas Gifts

Today I am teaming up with some of my all time favourite bloggers to bring you 9 gorgeous handmade Christmas gifts. These are some seriously talented ladies and I think you're going to love what they've come up with!  Scroll down past the links to see my little project and then have a look at all the others. So many inspiring ideas!!


Photobucket

9. Personalised Memory Matching Game from Max & Me


For my handmade gift I whipped up a little game of Memory Matching for Max. He has a great memory and loves playing these types of games, so I think he will absolutely love this little gift.

To make the game I printed out two identical photos of each person in Max's extended family. Then using my cricut I cut each photo down to a circle.


Next up I punched out another 24 slightly larger circles of white card stock and then another 24 (slightly larger again) circles from some scrapbooking card that I picked up at spotlight.

I layered the circles and stuck them all together to make the matching cards. So easy!!

I finished up by decorating a little round kraft box with some card & twine and I added the letter M (M for Max's Memory Matching) to the top of the lid.


Sweet and simple, I can't wait to play with Max once he's opened it up on Christmas day!

Now tell me, do you include handmade gifts each year at Christmas? What are you planning on making this year?


Wednesday, November 28, 2012

5 DIY Christmas Ornaments


I love Christmas! It’s easily my favourite time of the year, the food, family, festivities and the chance to fully embrace my other great love - DIY. There is something about Christmas that turns my crafty tendencies into complete overdrive. This year I’ve been busy making my own Christmas ornaments and I’m so excited to share them with you!


These sweet little wreaths are super easy and cheap to make and are perfect for traditional style Christmas decorating.
1.    You’ll need
    - bakers Twine
    - mini hoop (I got mine from spotlight)
    - clay stars (here’s a great recipe)
    - sequins
    - glue gun
    - scissors
    - string for hanging the ornament
2.    Hot glue the end of your twine to the hoop and start wrapping.
3.    Keep wrapping, stopping to add a dab of hot glue to the back every now and again.
4.    Once your hoop is completely covered secure the twine with more hot glue and then glue on your ceramic stars and sequins.
5.         Add some string for hanging and you’re done!


Hang one of these kissing balls in your house and make sure to use it to your advantage!
1. You’ll need:
- styrofoam ball
- christmas fabric
- 2 types of ribbon ( I used one thin and one wide ribbon)
- twine
- Christmas greenery (mistletoe if you can find it)
- scissors
- rubber band
2. Cut a square of fabric big enough to cover your ball (with enough extra to give a nice finish at the top), wrap your ball and secure with twine.
3. add rubber band above the twine and thread a long piece of the thin ribbon under the ball, through the rubber band and tie in a knot at the top for hanging. Add another piece of thin ribbon, crossing over at the bottom as shown and tuck into rubber band. Add more twine to secure the ribbon and remove the rubber band.
4. Tie a pretty bow around the twine.
5. Add leaves and trim the fabric done to look pretty.
6. You’re done, now get kissing!!


These are one of my favourite ornaments this year. They’re so simple to make, but a little time consuming. I recommend putting on a few episodes of your favourite show while you make these (Mad Men wins for me).
1.    You’ll need:
    - sheets of paper (I aged mine using this technique)
    - styrofoam ball
    - ribbon
    - string for hanging
    - scissors
    - hot glue
    - paint brush (or something similarly shaped)
2.    Cut your paper up into little squares (mine were 2cm x 2cm).
3.    Tie a piece of string (I used really thin gold ribbon) in a loop and hot glue to the top of the styrofoam ball.
4.    Fold a piece of paper around the end of your paintbrush, add a dab of hot glue to the point and attach to your ball.
5. Keep going until the entire ball is covered.
6. Tie a pretty bow and then hot glue it to the top of the ball, then step back and admire your creativity :).


These little rope mirrors are perfect if you're planning a beachy or nautical themed Christmas (I also think it could look really sweet hanging inside a dollhouse).
1. You’ll need:
    - small mirror
    - chipboard circle
    - jute rope
    - Christmas ribbon
    - scissors
    - hot glue
    - string for hanging
2. Hot glue your mirror to the centre of your chipboard and then hot glue a piece of ribbon to the chipboard (glue it on facing the wrong way as shown).
3. Cut a piece of jute to size and then glue around the outside of the mirror.
4. Repeat until all of the chipboard is covered.
5. Loop the ribbon over the joins in the jute and hot glue to the back of the circle (adding a piece of string for hanging as you go.
6. Reflect on how clever you are (couldn’t help myself, sorry!!).


These little hoop ornaments are incredibly quick to make and add you can make any shape you like. I’m planning on making one for each of my family members with their initial on them. Sweet and simple :).
1. You’ll need:
- small embroidery hoop
- hessian
- pencil
- cardboard shape to trace (I printed out a star shape and cut around it)
- scissors
- pencil
- sequin strand
- fabric glue
- twine for hanging
2. Cut out a small square of hessian, secure in hoop and then trim down the excessive fabric.
3. Trace your shape onto the fabric.
4. Draw over your pencil line with fabric glue.
5. Carefully position your strand of sequins along the glue lines.
6. Add some twine and hang and admire!

So there you have it, 5 easy DIY Christmas decorations to make this year. Let me know if you make any of these for yourself, I would love to see how the turn out.