I made the shelving from scratch and like I often do I just winged it. I asked Sean for advice, but he kind of said 'just do whatever you want'. So rather than googling or youtubing for tips on making shelving I went in blind.
It took me a bit of trial and error to get it right and because I was concentrating so hard on not hammering un-neccesary holes into the wall I didn't take as many photos as I would have liked, and some of the ones I did take were just on my phone.

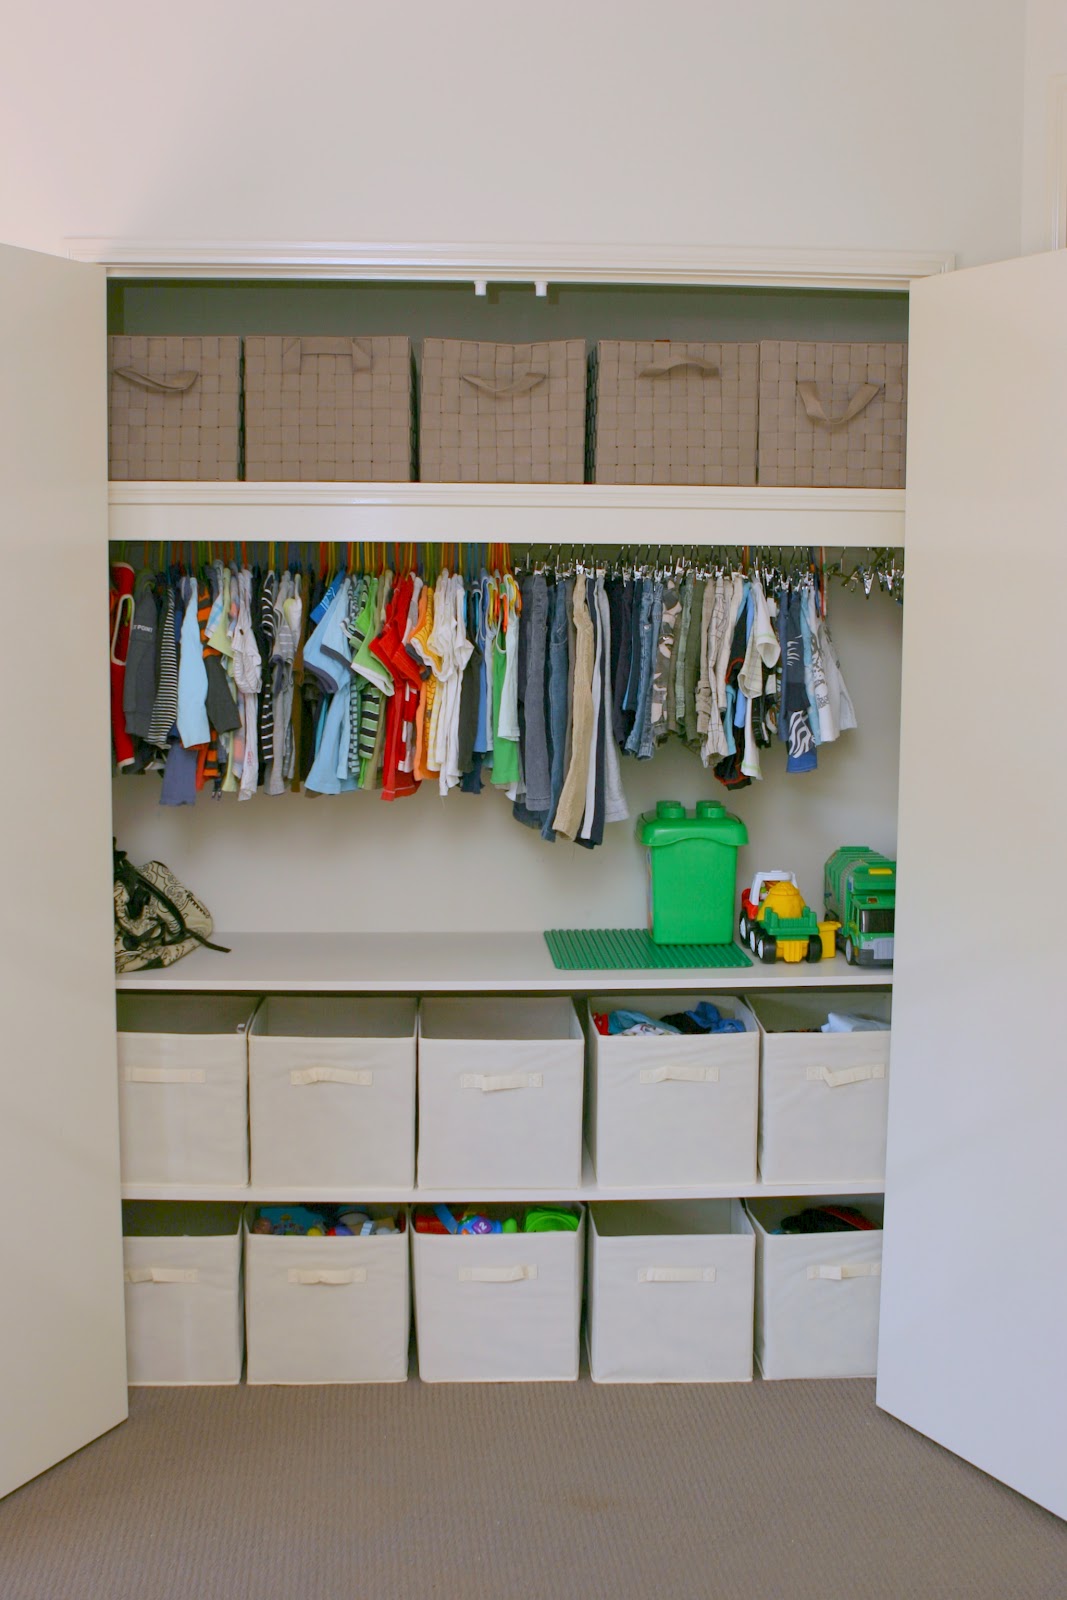
This is the space I started with. It's a lot wider than it looks in the photos - 1.7m wide to be exact. This room used to be our home office / craft room so the wardrobe was a bit banged up with lots of marks on the inside of it. I didn't worry too much about them though, you can't see them once the wardrobe is full.

We have a new Masters that has opened up just near home so I picked up all of my supplies from there. They offer a free cutting service so I got my boards and support timber cut to size before I loaded it all into my little corolla. It all worked out really cheaply too. I got the materials for under $45, the ten cloth storage boxes for $4.98 each and the 5 larger woven baskets for $12 each.
Once I got the boards home I primed and painted the shelves - I painted them the same colour as the walls in Max's new room (canvas cloth by Bristol Paints).

To instal the shelves I ran two rails (for the two shelves) around the walls of the wardrobe. I didn't get a better photo or a shot of the railing running the whole way round... You'll just have to picture it.

Then all I did is put the painted shelves on top of the rails. I didn't even need to screw the shelves to the railing, they're wedged in there so tight that they're not going anywhere.
I put Max's clothes and toy baskets back in and that was that. All done!!
It makes such a difference having a perfectly organised space. I seriously can't wipe the smile off my face each time I open the wardrobe doors.
 | ||
| (Max doing a random pose in his big boy undies - I swear he doesn't get it from me!) |
I'm so glad to have that part of his room finished. Next up I'm going to spray paint some frames for his art wall and install some open shelving on one of the walls. Can't wait to share it with you!

It looks awesome! You are such the DIY queen!! So good to tick things off the list too!
ReplyDeleteThanks Tamara!! It is such a good feeling to have them done. I feel like the rest of the things I need to do are so much more achievable now that I have some organisation going on in there :)
DeleteIt looks amazing! you should so be rightfully proud of yourself! High fives! xoxo
ReplyDeleteThanks Milina!!
DeleteGosh you are GOOD! I don't know how you can be bothered (seeing you are pregnant and all), but the result is obviously worth it! Well done. =)
ReplyDeleteThanks Melody :) I think it's the pregnancy that does it to me! I achieve so much more when I'm pregnant...
DeleteGreat job, Tamsyn! You really made the most of his closet.
ReplyDeleteIt feels so good to have it organised, thanks Brandi!
DeleteOh my goodness that is heaven! No wonder he looks so pleased. Now, will it stay that pristine for long? Please tell me it will! X
ReplyDeleteI wish... by 10am every morning it is chaos in there!! Max is pretty good at helping me pack up though, so we try and get it back in order every day by bedtime (doesn't always happen though).
DeleteThat is seriously awesome and I am do gonna steal this idea for the built-in in my study! Well done!
ReplyDeleteThanks Kylez! Once I got my head around it, it was really easy. Good luck, and make sure you send me some photos :)
DeleteI LOVE this - far more than I should!!
ReplyDeleteTerrific job.
:-) xx
Thanks so much Shar xx
DeleteThis is so fantastic, love it, you are so handy lady.
ReplyDelete& Max as always adorable x
Thanks Julia!! He has turned into such a little poser lately :)
DeleteThat's a wonderful closet, and your son is a real cutie pie! Congrats on a job well done!!
ReplyDeleteThanks Doreen!! :)
DeleteWe absolutely love your blog and find almost all
ReplyDeleteof your post's to be what precisely I'm looking for.
Do you offer guest writers to write content in your case?
I wouldn't mind publishing a post or elaborating on most of the subjects
you write in relation to here. Again, awesome
blog!
Also visit my webpage - เชียงคาน
Wow! This is such an awesome idea for organizing a child's closet! I love it!
ReplyDeleteI love this and might be ditching the dressers in my littles'room soon. I was wondering.... were the bins sturdy enough to hold up, and did your child ever dump all the bins?!
ReplyDelete